Skiff punt boat construction drawings. Making a simple boat with your own hands
Before starting construction, you should prepare the necessary materials, and draw cross sections on a sheet of graph paper or paper. If you do not find the recommended materials, they can be replaced. For example, spruce on pine, oak on beech, St3 can be used on any other one at hand. The outlines of the transverse force set are transferred from the plaza to the blanks of the transverse and vertical parts of the frames. They are cut, machined and carefully fitted together, then secured together using copper or brass nails and epoxy glue.
To assemble the frame homemade punt boat you need to prepare the slipway. As the latter, you can use the wooden floor of your workshop or make a board measuring 3500x1000 mm from boards 40-50 mm thick. On the slipway, a keel beam previously prepared in accordance with the drawing is installed and secured with wooden pads, on which the planes of the frames are marked. At the first stage of building the boat frame, frames No. 0 - 6 are temporarily secured to the keel beam using bars and nails. Moreover, the “zero” frame, consisting only of the lower element and the transom board, is installed at an angle of 10 degrees to the vertical plane.
Before fixing the frames, they must be plumb and level. Now you can begin installing the bottom stringers. Each of them is sequentially adjusted to the frames and secured with nails and epoxy glue. Lastly, the final installation of the keel beam is carried out using the same method. The second stage of frame assembly begins after the epoxy has completely hardened. To fit the stringers to frames No. 7, 8 and to the stem, they will have to be bent. Therefore, if they are not elastic enough, the front ends of the stringers must first be soaked or steamed. The installation of the frames and stem is carried out similarly to the previous ones.
It is better to fit the stringers to the frames and fix them in pairs, starting with a pair of internal ones that are symmetrical relative to the longitudinal axis of the boat. If the stringers have been soaked or steamed, they are fixed to the frames by twisting soft wire, then allowed to dry for several days, and then placed on glue and nails. The last and most difficult operation is connecting the stringers to the stem.
Each master will probably use his own technology for assembling such a place, but as a recommendation we give the following:
1. Mark and cut a groove in the stem blank for the keel beam.
2. Fit these parts and connect them with epoxy glue.
3. Leave until the glue hardens completely. 4. Mark and cut grooves in the stem blank for the upper stringers.
5. Fit these parts and glue them together. 6. Leave until the glue hardens completely.
7. Carry out the operations specified in n.n. 1 -6, for connecting the stem with the rest of the stringers.
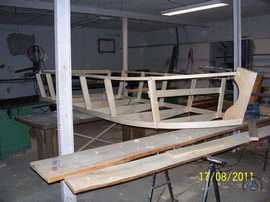
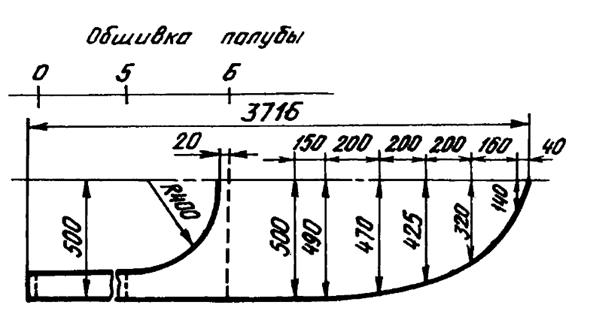
Now the frame homemade punt boat roughly ready. We need to prepare it for covering. To do this, use a flexible lath to check the smoothness of the contours and, if necessary, modify the frames and stringers with a plane, rasp and coarse sandpaper. The boat's skin consists of three pieces, cut according to the drawings shown in the figure. If you don’t have sheets of plywood of the required size on hand, blanks can be made from several parts by connecting end-to-end and strengthening the joint after adding wood flour (can be replaced with baby powder or talcum powder) to reduce the fluidity of the glue and ensure the continuity of the adhesive seam.
The sheathing is secured to the frame in the following sequence: on the bottom, on the sides, on the deck. Before covering the deck, in order to increase water resistance, it is necessary to cover the internal surfaces of the sides, bottom and deck blanks with several layers of hot drying oil or parquet varnish. After the fender bars are attached to the skin and the glue has completely hardened, the boat hull is sanded, all sharp edges are smoothly rounded and the joints are filled with epoxy glue with the same additives.
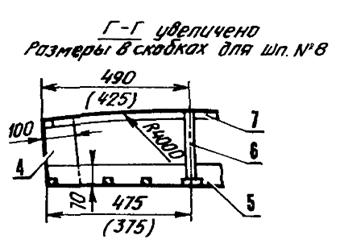
To improve the boat's directional controllability and protect the bottom from damage, you can lay 2 - 3 wooden beams with a cross-section of at least 25x25 mm along it from below. We also recommend installing a fender on the bow of the deck to protect the boat from water getting inside. This is due to the fact that the bow of the deck is slightly tilted down and forward and even a small wave will cover it. When starting to install the boat equipment, you need to remember that all holes in the hull, after drilling them, must be treated with hot drying oil or varnish. The oarlock nest is made of two steel plates with four holes for M8 bolts and one central diameter of 20 mm, and which (only for the top plate) is welded with a 90 mm tube with a diameter of 20x2.5.
The corresponding holes are drilled in the sides of the deck, a socket is inserted, a lining is inserted from below, and everything is tightened with bolts. The oar consists of an oak pole, a blade and a lock. The clamp is made from two pieces of rubber hose and a 2 mm thick duralumin ring. The blade is inserted into the cut of the pole. They are drilled together in several places for 2-3 mm rivets and riveted. It is better to place washers of large outer diameter under the rivet heads and on the opposite side. The duck is made from a rod welded to a round base with four holes for M6 bolts. When making the base, you need to keep in mind that you will need a part of a similar configuration as a lining.
To equip a boat with a rudder, you need to install a stock on the transom board. It can be made from a pipe and two brackets welded to it. The cans are installed on beams and supports secured to the frames. Now the entire hull of the boat is coated several times with hot drying oil and prepared for painting, but the instructions included with the paint you have chosen; It is better to paint it with bright enamel paint. The ship is ready and sparkling in the sun. You are planning to have a nice time on a river or lake. But do not forget that after each use the boat must be thoroughly dried, then it will serve you for many years. Even if you are a good swimmer, you should purchase a life jacket.

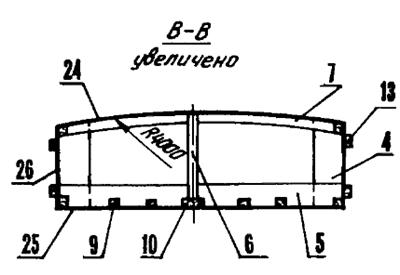

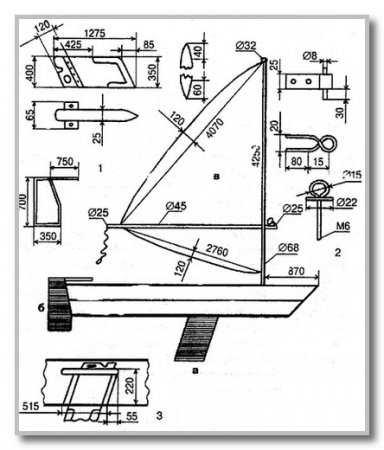
Homemade boat punt (in image “b” the casing and cans are conditionally not swayed): 1 — side edging of the transom (spruce, block 25x25, 1.280); 2 — lower edging of the transom (spruce, block 25x25, L1000); 3 — transom board (spruce, board 280x15, L1000); 4— frame stand; 5 — lower element of the frame; 6 — deck support; 7—upper element of the frame; 8 — stem (oak, timber 80x50, 1.400); 9 — stringer (spruce, block 25x25, L4000); 10.....keel timber (oak, timber 45x25, L4000); 11— smaller slan; 12 - slan; 13 — fenders (spruce, timber 30x25, 1.2500, 4 pcs.); 14 — oarlock socket; 15 — chipper (spruce, board 100x10, 1.1000, 2 pcs.); 16 - duck; 17 — beam (spruce bar 25x25, 1.450, 4 pcs.); 18 — front bank (spruce, board 270x20. L1000); 19 — support (spruce, block 25x25, 1.125, 6 pcs.); 20 - oarlock; 21 - oar; 22— feed can (spruce, board 250x20, L1000); 23 — stock (StZ, pipe 30x2.5, L250, strip 30x2, L70); 24 — deck sheathing (plywood, s4, 3750x1020); 25 — bottom trim (plywood, s5. 3700x1060); 26 — side paneling (plywood, s5, 3750x300); 27—supporting beam of the feed can (spruce, timber 25x25, 1.1000)
![]()
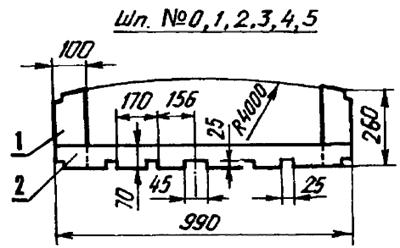
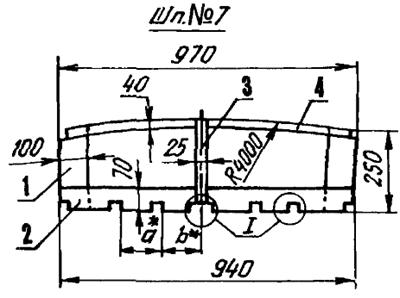
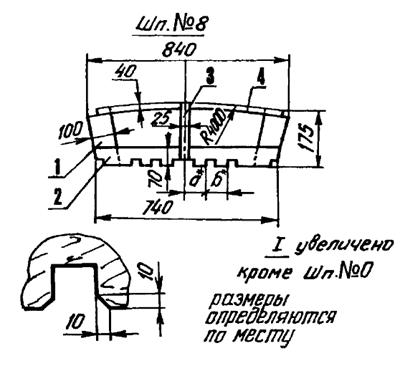
Frames of a homemade punt boat: 1 - frame stand (spruce, board 100x10, L280, 16 pcs.); 2 — lower element of the frame (spruce, board 70x10, L1000, 9 pcs.); 3 — deck support (spruce, block 25x25); 4 - upper element of the frame (spruce, board 25x10)
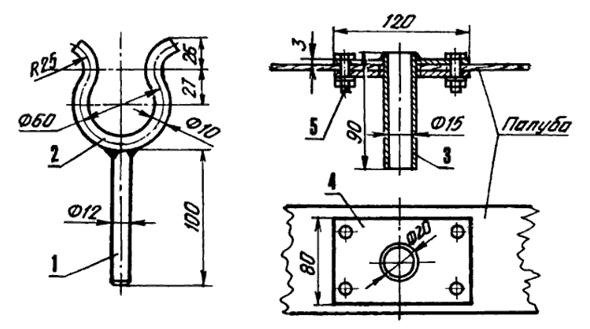
Oarlock and socket: 1 - oarlock axis (St.Z, rod 12, L100.2 pcs.); 2 — oarlock (St.Z, rod 10, 2 pcs.); 3 — axle (St.Z, pipe 20x2,5,2 pcs.); 4 — plate (St.Z, sheet s3.4 pcs.); 5 - washer, nut, bolt M8x20.8 pcs.)
Paddle: 1 — blade (plywood, s5, 2 pcs.); 2 — pole (bast, circle 25, L2000, 2 pcs.); 3 — retaining sleeve (rubber, 4 pcs.); 4 — ring (duralumin, s2, 2 pcs.)
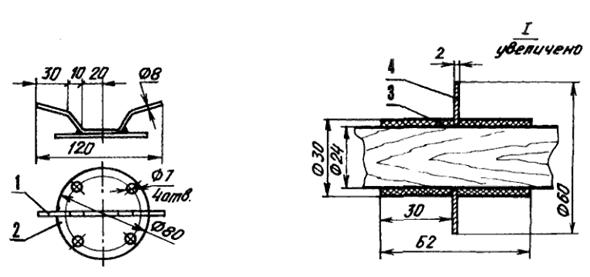
Duck: 1 - duck (St.Z, rod 8); 2 - base (St.Z, sheet s3, 2 pcs.)
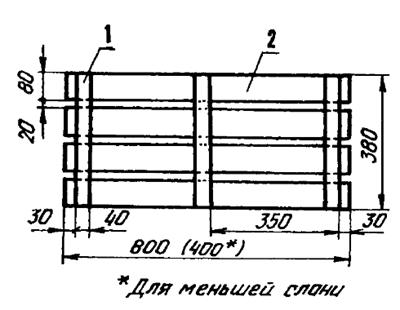
Slans 1 - cross beam (spruce, beam 40x25, L380); 2 - board (spruce)
First project
To make a boat at home, you need 3-3.5 meters of tarpaulin, or a conveyor belt 1.2-1.5 meters wide, two boards 200-220 long, 20-30 wide and 3-3.5 centimeters thick, both boards of even length, rounded on both sides. A block for spacers and a seat is nailed to each. At best, it is advisable to soak the boards in drying oil with wax or paraffin, then paint and dry. Then nail the belt strip with nails at intervals of 1-1.5 cm; to the end of the boards. Before nailing the tape, we apply paint and lay a tarpaulin over the paint; the tape must be laid on the tarpaulin and nailed to the sides of the boat. With the help of spacers, the boat can be easily assembled and disassembled. For convenience and to stand more confidently on the soft bottom of the boat, you can place plywood or thin boards across the boat and secure it with wedges. The gliding of a boat is no different from an inflatable one. When disassembled, such a boat fits well even into a motorcycle sidecar or on the trunk passenger car and transported.
Second project
DIY punt boat
A punt boat designed by A.V. Zhemerikin can be used for economic purposes, on hiking trips, and fishing (Fig. 17). The design of a punt boat is very simple. The boat is designed for a load of up to 400 kg, weighs about 150 kg, and the draft depth does not exceed 20 cm. It is easy to store and can be sailed. It can be equipped with an awning or a small aft cabin, attach a motor or install a sail.
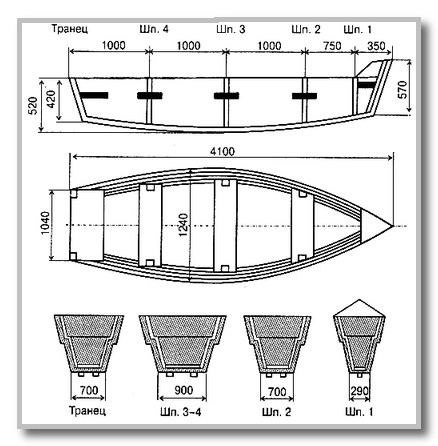
Rice. 17. Frames and transom of a punt boat designed by A.V. Zhemerikina
Making a punt boat
To make a punt boat you will need:
7 pine boards 15-20 mm thick, 300 mm wide and 5 m long - for cladding;
3 pine boards 50 mm thick, 300 mm wide and 4 m long - for oars, stem, frames, cutwater, false fins;
pine board 30x200 mm long 2 m and two sheets of plywood 3-5 mm thick - for the transom;
1 kg of oil paint (iron lead) - for filling joints
3 kg of white on natural drying oil;
1.5 kg of nails 50 mm long;
1 kg of screws 50 mm long.
First, frames are made 200 mm above the side level, then the stem and transom. They are installed on a keel board (50x20 mm and 4 m long) and nailed. Benches are placed between the frames and they are also nailed down. The upper part of the frames, stem and transom are attached to the side mounting boards (20x200x5000 mm), which together with the keel board form something like a formwork that fixes the basic shape of the boat. At the end of the work, the installation boards are removed, and the extra 20 cm of frames are sawed off. Then the lower side boards are nailed, and the lower edges are carefully cut with a saw.
The next cycle is to attach the top side boards, tear off the keel board and nail the bottom boards in its place. Along the connecting lines of the boards, 3 false posts are attached for better sealing of the joints. The joints should be thoroughly caulked with tow soaked in drying oil, puttied and sanded. After this, you can make a trunk out of plywood in the bow of the boat and a fish tank under the middle bench. Everything is painted inside and out with two or three layers of oil paint.
The oars are made from two boards measuring 30 x 1 x 30 x x 2400 mm.
As mentioned above, the boat can be sailed. To do this, it must be equipped with a lowering centerboard keel and rudder. The centerboard is placed in a centerboard well, which is installed in front of the middle bank and connected to it with bars (Fig. 19). Attaching the well to the bottom must be done very carefully, using thick paint or waterproof glue. Through the bars, the base of the well is connected to the keel and casing using M6x80 through screws every 60 mm.
Keel (a), rudder (b) and sail (c) of a punt boat designed by A.V. Zhemerikina: 1 - loops that are attached to the steering wheel with pins; 2 - loops that are attached to the transom without pins; 3 - butt
The centerboard is cut from thick plywood, glued together from two or three boards along the width, or cut from a sheet of metal 4-6 mm thick. In all cases, the gap in the keel should be 4-6 mm wider than the thickness of the centerboard. The bars at the upper end of the centerboard serve as limiters when lowering it. On a metal centerboard they can be made from corners. The wooden centerboard is held in the lowered position by a rubber sling.
The steering wheel is cut from 8 mm plywood or 12 mm thick boards. It is hung using two loops with pins. The same 2 loops are made on the transom, but without pins and with mounting strips rotated 180°. To avoid accidentally losing the steering wheel, it must be tied to the transom with a thin weed cord. A mast with a rounded solid cross-section with a maximum diameter of 68 mm is best glued together from two finely straight-layered pine bars. The lower end of the mast (spurs) is made of a square section for fastening in a socket - step. The second mounting point for the mast is the hole in the front canister.
The sail can be made from any strong and dense fabric: AM-100, raincoat, teak for feathers, or, in extreme cases, calico. The sail is laced to the mast; The upper and lower corners of the sail are tied using the corresponding holes in the mast. While sailing, the sail is stretched by a batten, the front end of which is tied to the axle with a reef knot. In the event of a sudden increase in wind, it is enough to pull the end of the cord and the sail will be completely de-winded. It is not difficult to pull the mast out of the step and put it in the boat. If necessary, the area of the sail can be reduced by screwing it onto the mast, but then it is carried without a yard or the yard is attached to the bottom of the mast.
Design punt boats, with a keel length of 3 meters, a bottom width of 0.8 meters and a side height of 0.3 meters, provides a carrying capacity of up to 200 kilograms and the ability to maintain sufficient buoyancy necessary for fishing and hunting. The flat bottom gives the punt boat good stability, i.e. ability not to tip over, and makes it easy to produce frames without resorting to searching for old arches and runners, as Bukreev recommends. The flat bottom of a punt boat is also more convenient for a flooring made of longitudinal slats, along which you can move freely without fear of stepping on the canvas bottom.
To make the frame of a punt boat, it is best to take dry spruce, but you can also use pine, aspen, fir or alder. The cross-section of the slats depends on the purpose for which they are intended. For example, the cross-section of the keel, as well as the side and bilge slats, is 30x15 millimeters, the cross-section of the stem is 30x30 millimeters, and the deck slats are 10x15 millimeters. Made from a piece of 30-mm board, the sternpost is a trapezoid whose smaller and larger sides are 150 and 200 millimeters, respectively. The cross-section of the additional slats is 15x15 millimeters. There must be at least six of them. It is advisable to sharpen the slats and fill their edges. Fastening is done with screws.
The frame of a punt boat can be sheathed not only with tarpaulin, but also with any other durable material. After this, to make it waterproof, you need to paint it once or twice with oil paint or, even better, bitumen mastic, which you can easily make yourself using this recipe: bitumen - 1 kilogram; grease or birch tar - 0.2 kilograms; gasoline - at least 1 liter.
After heating the resin to a liquid state, you need to pour a solution of solid oil in gasoline into it and stir thoroughly. For safety, the hot resin should be kept away from the fire, by adding a small portion of gasoline, check it for flammability and only then pour in the solution. If, after cooling, the resulting mastic is not liquid enough to work with a brush, you need to add gasoline to it and mix again.
2-3 days after painting with this mastic gasoline will evaporate, and the boat’s hull will be covered with a thin, unbreakable film that fully satisfies its purpose. The middle frame determines the greatest width of the punt boat.
Assembling the punt boat frame it starts like this. To the middle of the keel rail you need to screw the largest in size, the so-called middle frame. Its elongated side posts are fastened at the top with a temporary strut strip. Then, using long nails or screws, install the stem with a slight inclination in the upper part forward and the sternpost with a slight inclination in the upper part back.
If the sternpost is installed vertically, i.e. without tilting, then such a stern can be used for outboard motor. After this, the zygomatic rails are screwed in such a way that they are 15 millimeters below the frame. Then the upper side stringer is installed. The remaining frames are adjusted in place. Their size and configuration are determined by the circumference of the stringers. Now the upper side stringer rails are secured in the corresponding cutouts. As for the bow of the punt boat, it can be made sharper by attaching a breakwater in the form of a triangular prism made from a wooden block. The seats can be made with emphasis on the middle, bow and stern frames for the corresponding parts of the boat.
Cutting material for sheathing you need to start by preparing two strips so that the width and length of each of them is equal to the width and length of the side. Having fitted them in place, you need to fasten them with small nails to the side springers and the end parts of the sternpost, and sew the bow part. The bottom is cut out separately. If the cut of the bottom of a punt boat does not turn out to be solid, then it can be ground off from pieces.
The cut out bottom of the punt boat is sewn along the edge of the bilge slats to the side strips. You need to sew with a coarse thread and a large stitch. It doesn’t matter if the seams are not tight enough. After this, they are coated with mastic or thick oil paint and covered with strips of thinner material at least 80 millimeters wide. Increasing the thickness of oil paint is achieved by adding finely sifted chalk or tooth powder to it. Only after this can you begin painting the entire boat.
For such a punt boat, the oars can be made with oarlocks, or you can use a two-blade kayak oar made from a single piece of wood or made locally using a method.
The dream of making a boat with your own hands is common to many fishermen, and making it a reality is not so difficult. In our area, boats are made from various types of wood, alder, willow, spruce, but most often from simple pine boards, and many people like this craft. Yes, the boat is a bit heavy, but it is straight-layered. And this tree is resinous, which largely protects the body from rotting.
It’s generally not customary for us to paint a boat; it steams under the paint and gets fussy. Previously, they were impregnated with technical oil, but now they are mostly used for working off motor oil, that is, a free train. Of course, now the stores are full of protective impregnations for wood, including very reliable ones, but you need to buy it. And so he soaked it in oil every year in the spring, and it will run for twenty years, and the wood will not crack from the oil.
We cut the boards at a sawmill for thirty, that's all. Then we plan out 25. The bottom may be a little thicker, it needs strength. We plan the boards only on one side, which will go inside the boat; the outer side does not need to be planed. The length of the body (and, accordingly, the length of the boards) is chosen largely according to habits, and not according to the required load-carrying capacity. The range of lengths is usually from 4 to 6 m.
Personally, I have a 3.5 m boat, four of us sailed on it without any problems under a small Salyut motor and sailed 5 km to our proven places. What I mean is that the boat, of course, should be as safe as possible, the loading should correspond to the actual carrying capacity, but if you plan to go fishing on small lakes and rivers with two or three people (especially one), then there is no point in making a large boat, which is only needed for lakes where big waves drive.
 It is wrong to focus on the already familiar lengths of inflatable “brothers”, because most of their internal space is taken up by their voluminous sides. And for wooden ones they are minimal - 25-30mm; often thinner boards are chosen to lighten the weight.
In the same desire - to have a lighter boat - they try not to make particularly large hulls. Moreover, than bigger boat, the greater its inertia of movement, and accordingly, the worse its maneuverability, and this is often simply necessary when fishing.
 When making your first boat from boards, it is worth considering that the wider the board, the fewer cracks - potential leaks. My cracks are such that you can’t push a knife through, it’s made very tightly, but you need to fill your hand, and I coat all the joints with additional silicone. But usually during the manufacturing process and bending the boards, cracks appear that are immediately caulked. You can use moss or construction strands; a glazing bead or aluminum wire is clogged on top. This is enough to prevent the boat from leaking, but if you pull it ashore and lie there for a month, and not yet in the shade, but in the sun, it quickly dries out.
About fastening boards. Previously, they were fastened either quite simply - with nails, or they demonstrated the highest class - with wooden fingers without a single nail. Nowadays a compromise option is in use - self-tapping screws. This is much more reliable than using nails, and not as labor-intensive as “no iron at all.”
The sides can be made with an inclination, or vertical, the latter option is easier to manufacture, but the navigability of such watercraft is slightly worse. In any case, you will have to bend the side boards in the longitudinal plane. For this you need a device. Someone uses special rope blocks, as they did in ancient times. Some people use suitable clamps. There are many options here, and they only affect the convenience of work. The main thing is how to bend! Slowly, gradually increasing the load so that the board does not burst. If it is dry, you need to moisten it with water. It is unlikely that it will be possible to bend it well in less than a day; there is no need to rush in this matter.
 Increased reliability of the boat is given by stiffening ribs, which are usually made of durable wood, usually oak; the pointed bow is also made from it, into which the boards of the bottom and sides are inserted, not on nails, but in specially cut grooves with a strictly adjusted angle of inclination.
In terms of shape, I prefer a boat with a wide front. The maximum width in the bow is about 80cm, then everything is narrower, and in the stern area it’s only 30-40 centimeters, just to make it comfortable to sit alone. And only when we plan to install the engine, do we make the stern wider, 50-60 cm. Side height 38-40cm.
This shape of the boat allows you to confidently steer it from the stern with just one oar - our local traditions, which we do not change from year to year. And largely due to the fact that when passing through small places you have to constantly push off from the bottom with an oar. Accordingly, it is quite long (2-2.5m) and strong, usually made from ash.
Almost everyone walks along the river with one oar, even women go milking cows. From childhood we teach boys to use one oar. But we have no idea about two oars; it’s all considered pampering. Although, of course, to each his own. On the same large lakes you won’t be able to paddle a decent wave with one oar. So all kinds of boats are important, all kinds of boats are needed.