Making a transom for an inflatable boat. How to make a hinged transom for a PVC boat
Almost every angler dreams of purchasing a boat that expands his capabilities, especially in conditions when he has to fish in wild waters. It is usually difficult to fish from the shore in such reservoirs due to the presence of dense vegetation located along the banks. Having a boat makes it possible not to pay much attention to such inconveniences.
Retail outlets stock various designs of boats made from modern PVC material. As a rule, inflatable boats are of interest because they are more practical and easier to operate. Inflatable boats do not have excessive weight, so they are easy to move both along the shore and on the water. In addition, they do not take up much space, especially when uninflated. This is especially true when the boat needs to be moved to a pond or stored. Small models of inflatable boats do not require special means for transportation.
Such simple designs are subject to modification, which is what many anglers do. The most popular part of any boat is the hinged transom, which will serve as a further attachment point. outboard motor.
If purchased separately inflatable boat PVC and an outboard motor for it, it will cost much less. But there is a small problem here that does not allow you to simply install an outboard motor. The fact is that the motor is installed on a transom, which you can buy, or you can make it yourself. Naturally, making it yourself will be cheaper. The main thing is that the owner knows how to work with tools and various materials. On the other hand, our fishermen are jacks of all trades and can cope with such a task in no time.
Despite this, you need to be very careful and responsible, otherwise the design will turn out to be unsuccessful and dangerous during operation.
![]()
The transom is where the outboard motor is mounted. It must be a reliable, firmly fixed structure. Therefore, the manufacturing process cannot be approached irresponsibly. This element must not be allowed to be unstable and not durable. Mistakes on the water can end in disaster. This is especially true when there are several people in the boat and their well-being depends on this structural element.
When carrying out work, you should strictly adhere to the basic recommendations, taking into account specifications PVC boats along with a motor that will be attached to this element.
The transom for an inflatable boat is designed exclusively for a specific model of an inflatable boat, since boat designs come in a variety of sizes and vary in size. As a rule, those boat models that are sold without an engine and are designed for oaring are not allowed to install outboard motor, more powerful than 3 Horse power. Such a motor will allow you to move in an inflatable boat through the water at speeds of up to 10 km/h. Such inflatable boats have limitations related to the weight of the motor. By and large, such boats are not designed to have outboard motors installed on them.
Before starting work, you should carefully study the technical data of the PVC boat and the motor in order to correctly calculate the suspended transom.
Since the boat has no big sizes, then the transom is an additional load, especially with a motor. At the same time, you need to take into account that the boat is made of thin PVC material.
And yet, such a transom is capable of supporting a boat motor with a power of up to 3 horses, which contributes to more comfortable fishing conditions. At the same time, you should carefully consider the entire structure, since it puts significant pressure on the stern of the boat. The more powerful the engine, the greater its mass and the greater the load it puts on the material of the boat.

As a rule, a hinged transom for a boat is very simple design, consisting of:
- From a plate.
- From fastening arches.
- From the rings, which are also called bubyshki.
The plate is made from a plate and can have any shape. Mounting bows are brackets that are attached to both the plate and the boat using eyelets.
The eyelets have a unique design, consisting of special brackets that have a flat base.
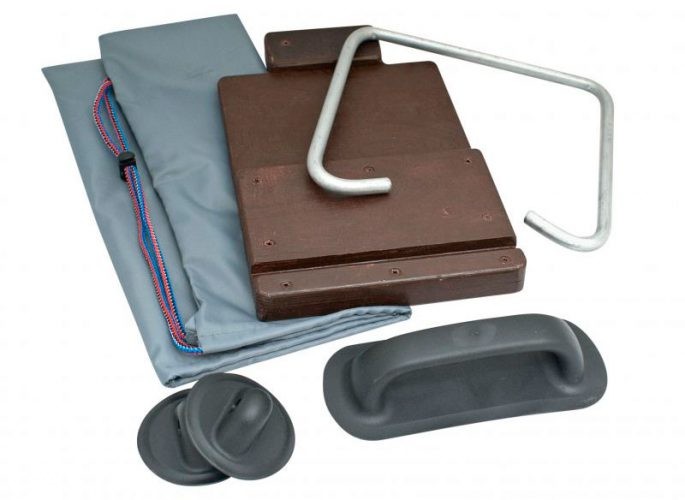
Only waterproof plywood is suitable for making the plate. It is quite light and durable, and at the same time has a polished surface that can protect the structure from negative natural factors.
For the manufacture of staples, rolled steel is used, which is bent depending on the given shape. Most the best option– this is the use of stainless steel or steel with a special coating (chrome, nickel, zinc).
The presence of steel elements allows you to create a durable structure that is resistant to deformation. If the elements have protective covering, then the design is durable and protected from corrosion.
The eye is made of plastic, which is characterized by lightness and resistance to moisture, as well as other negatives. In addition, the plastic easily adheres to the PVC base from which the boat is made. For fastening, only moisture-resistant glue should be used.
Manufacturing
All work begins with a drawing. Moreover, a drawing of the simplest transom design will do.
For the plate, plywood with a thickness of 10 mm is used. The edges of the plate should be sanded to avoid damaging the boat. Loops are attached to the plate, which will serve as a fastener for metal brackets.
The fastening arcs are bent manually or on a machine.
Eyes are purchased separately; if all the parts are ready, then they should be installed on the boat.
Installing a transom on a rubber boat
It is preferable to install a transom on a boat made of PVC material as follows:
- First of all, inflate the boat and, using glue, attach the eyelets. Moreover, it is very important that they are glued exactly in those places where they can be useful.
- The base of the eyelets is covered with adhesive, after which they are attached to the boat. The rest of the eyelets are attached in the same way. Depending on the size of the fastening arcs, the required number of these fastening elements is installed. When the glue is completely dry, the air should be bled from the boat and the mounting arcs should be connected to the plate.
- After this, the boat is filled with air again, but not completely, but half. The fastening arches are installed so that they can be secured using eyelets. Finally, the boat is fully inflated and the entire structure is held securely on the boat.
The height of the transom, or in other words the size of the plate, depends on the height of the sides of the boat in the inflated position. The transom may be equal to the height of the sides or may be larger, or smaller, but not by much. The main condition is that the motor is securely and firmly held on the transom, and is also safe during operation.
The classic transom consists of two brackets and four eyes. If you need to strengthen the transom, you can increase the number of brackets, and therefore the number of eyelets. At the same time, we should not forget that additional fasteners increase the weight of the structure, which is an additional load on the boat, including the material from which the boat is made.
Conclusion
In fishing conditions, when long distance travel is required, it is very difficult to do without a motor, since the entire load falls on the hands. This means that you won’t be able to row far. Fishing with oars is comfortable only on small lakes or ponds, where a boat motor is not necessary. Although fishing can be comfortable in such conditions, the main thing is that having a boat allows you to fish hard-to-reach areas of water bodies.
Naturally, having a motor will make the fishing process easier, but you should think about how necessary it is. If you plan to fish in large bodies of water, then it is better to buy a PVC boat along with a motor. Although it is more expensive, it is reliable, since everything is calculated here. In addition, the motor can be powerful, which will allow you to move quickly through the water.
It is not at all necessary to buy a boat with a transom for a low-power (no more than 2 hp) motor. To do this, it is quite possible to use an O-shaped boat, on which you can mount a homemade transom.
Below I will describe this modernization, which I did first for an old rubber boat with low sides, and subsequently for the Piranha. With this motor mount design, I successfully plumbed on the Oka River for 4 years under the Salyut EM motor.
First of all, I want to note that I will not intentionally give dimensions, since they will have to be made specifically for the required boat.
The point of modernization is that a solid base is laid on the bottom of the boat. Spring fittings are mounted on it using brackets, to which the transom itself is attached.
All this can be installed on the boat within 10 minutes.
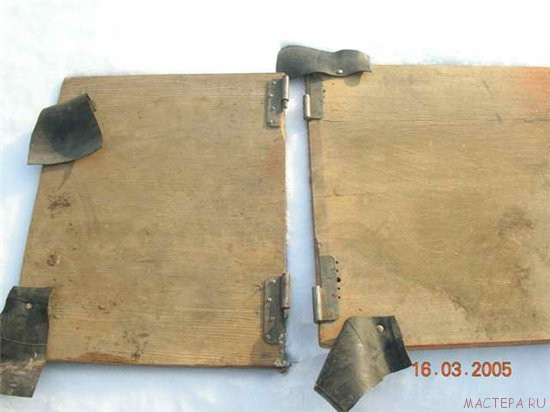
For the base you can use thick plywood. It is advisable to paint it a couple of times so that the paint is absorbed. The "Piranha" has a rather long bottom, so I made the bottom from two halves, fastening them with ordinary window hinges. It is not necessary to make a hard bottom the entire length of the boat. Mine is a little longer than half the boat. This is to load the bottom in the center of the boat, shifting the center of gravity away from the engine.
For the bottom I used a door from an old cabinet. Chipboard cannot be used for these purposes!
So, we measure the plywood to the size of the bottom of the boat. In general, the thicker the plywood, the better. In the corners I attached rubber from a car inner tube so that the corners would not rub the rubber of the cylinders. It should be fastened with short screws, but not with nails.
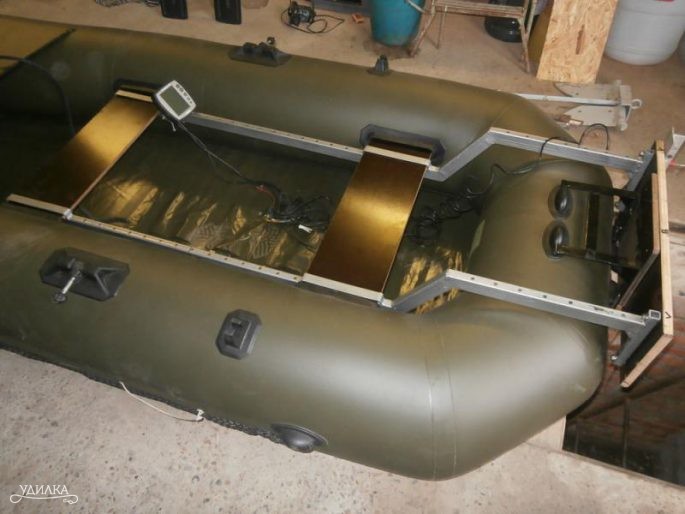
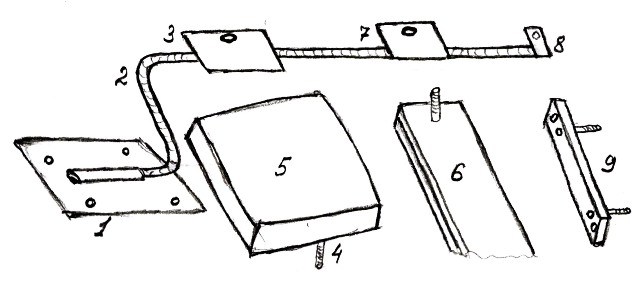
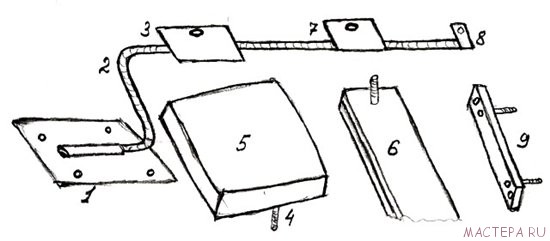
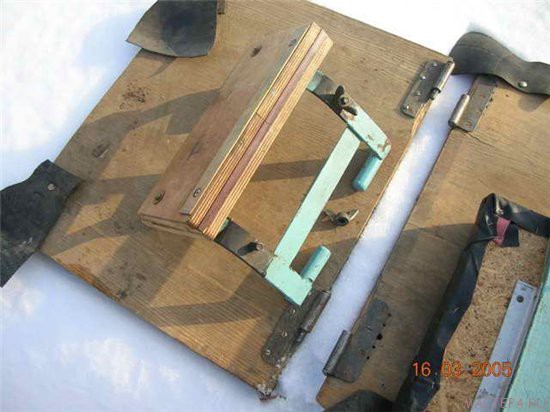
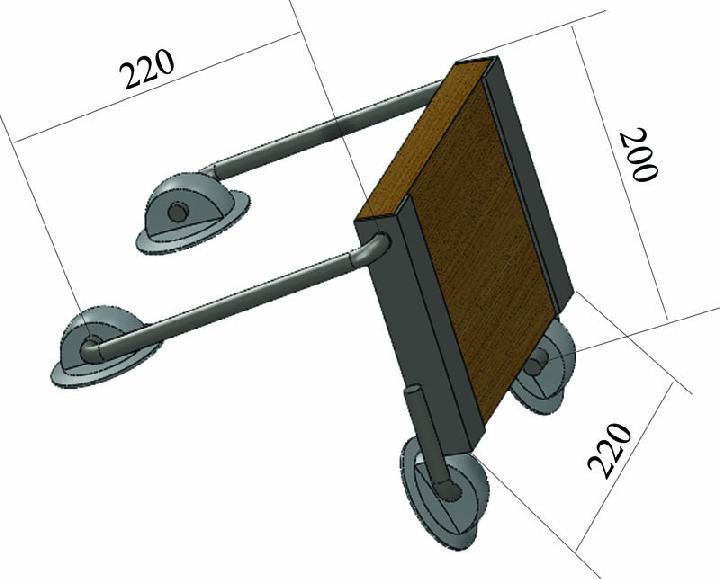
Having adjusted the bottom to size, we attach two metal bases 1 with a tube welded to it onto it. The tube is from a half-inch water pipe.
Ordinary ribbed reinforcement 2, which is used in construction, is inserted into the tube. To bend the reinforcement correctly, make a template from thick wire. Both reinforcements must be bent equally. It is necessary, of course, to measure the required bend of the reinforcement on an inflated boat.
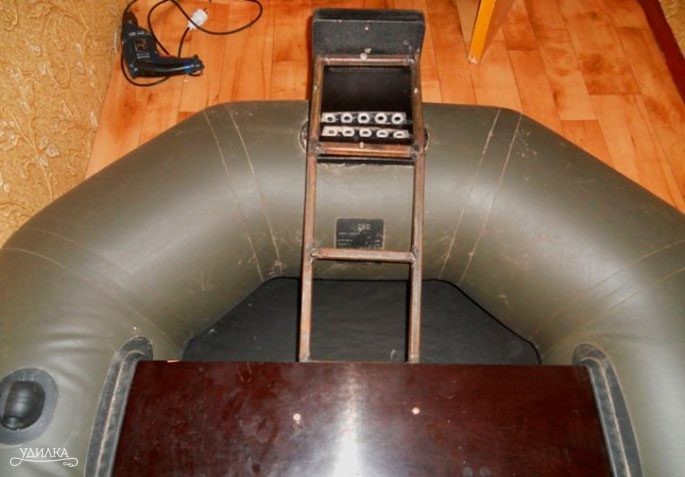
For the reliability of the design, I fastened both fittings together with seat 5, on which, in fact, I sit, controlling the motor. Plates 3 (for fastening the seat) with a hole are welded on the fittings. 4 bolts are fixed inside the seat (so that they do not turn) and with the help of “wings” the seat fastens both fittings.
Next, a very important thing is mounted. These are, in fact, two thick plywood 6, fastened together. A groove is hollowed out between the halves for the bolts, with the help of which this plywood is attached to the reinforcement through plate 7. This plywood (or board) stand should lie on the rear side its entire length! The purpose of this board is that when the engine is loaded, it does not bend the entire bottom, but mostly puts pressure on the rear cylinder.
I would like to warn you that motors with a power of more than 2 hp. This design has not been tested, so when installing a more powerful motor, you should be very careful. Most likely, at full throttle, you just capsize the boat.
Making a transom is also not difficult. Again using multi-layer plywood. Having selected several layers of plywood so that the motor can be attached to them, fasten them together with any brackets. It is advisable to paint over it all several times.
I would like to draw your attention to the fact that the transom must be mounted to a certain height specified in the passport for the motor.
Let me note once again that this entire structure is mounted on the boat using “wings” within 10 minutes. Carry a supply of “lambs” with you, since everything is mounted when the boat is on the water and it is very easy to drop the “lamb” into the water.
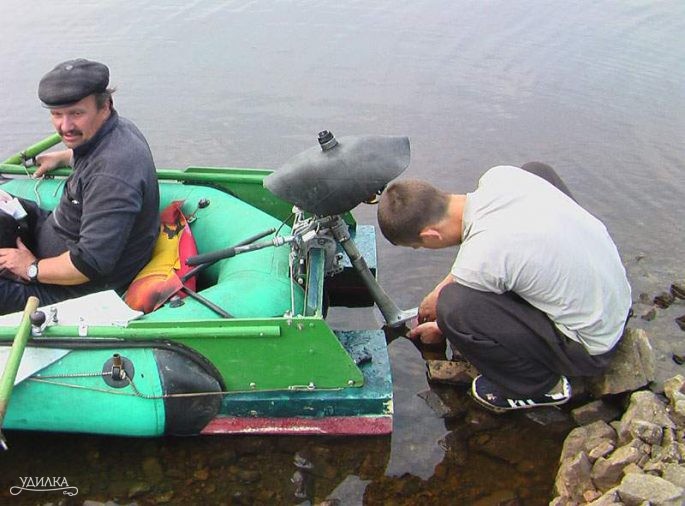
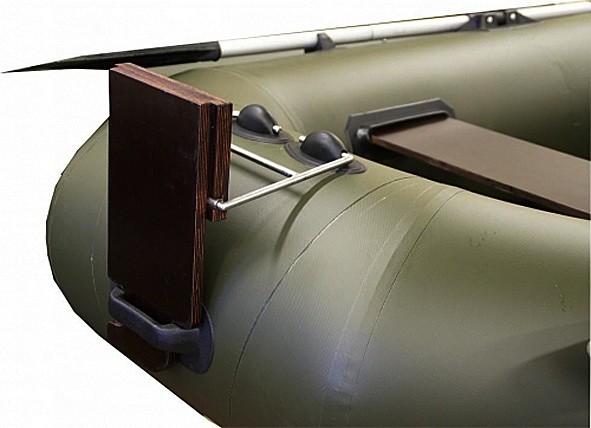
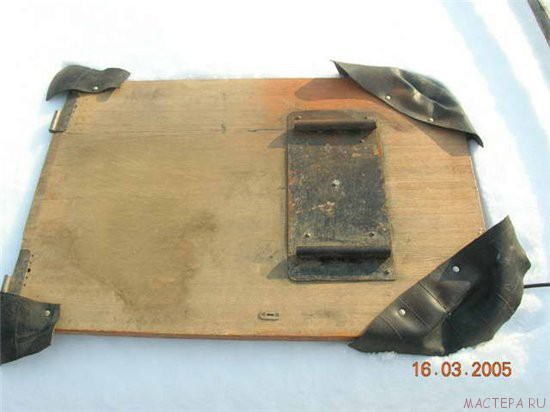
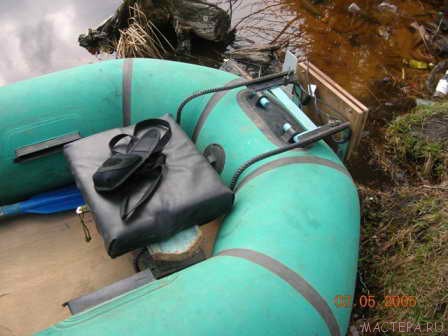
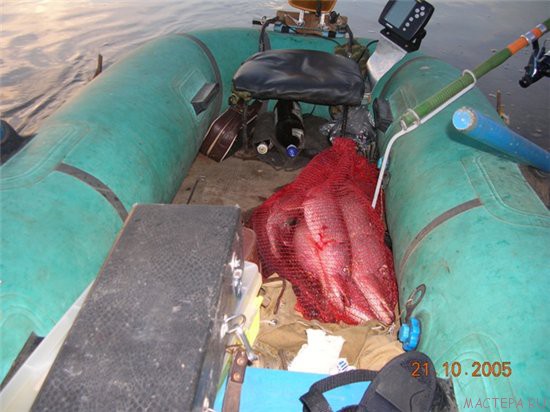
Look at a few photographs of a similar modernization for the rubber Piranha - 2M. This boat already has a glued transom, but when installing a 2 hp motor. the boat bends strongly as the rpm increases. The finishing touches were carried out and the boat has been in operation with this engine for 2 years. Because The boat has fastenings for the transom, but of course there is no board on the rear side.
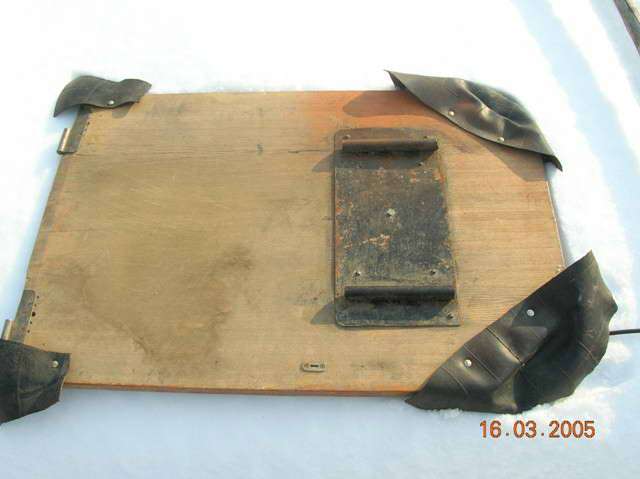
Homemade bottom from an old cabinet door
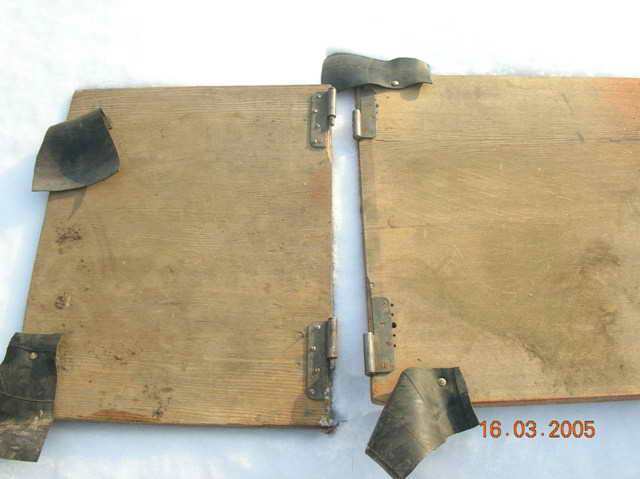
The second half of the bottom, fastened to the first loops

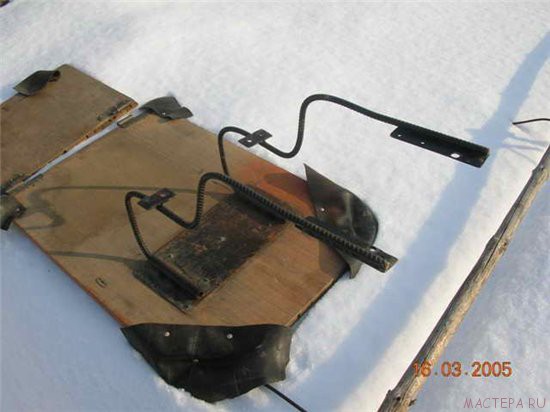
Inserted into reinforcement grooves
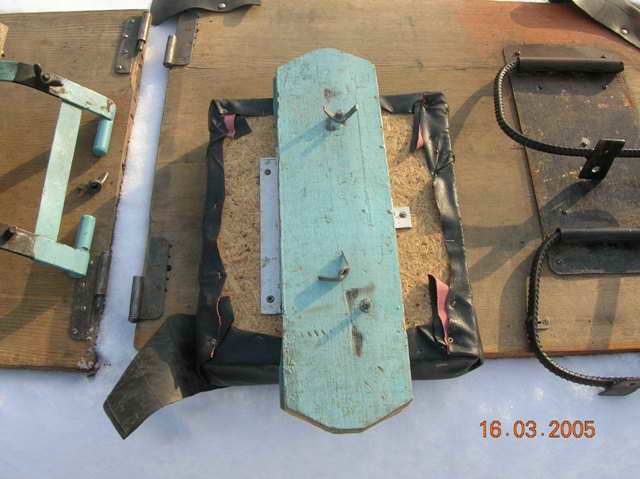
Seat with fasteners

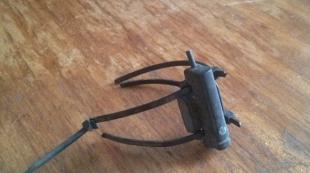
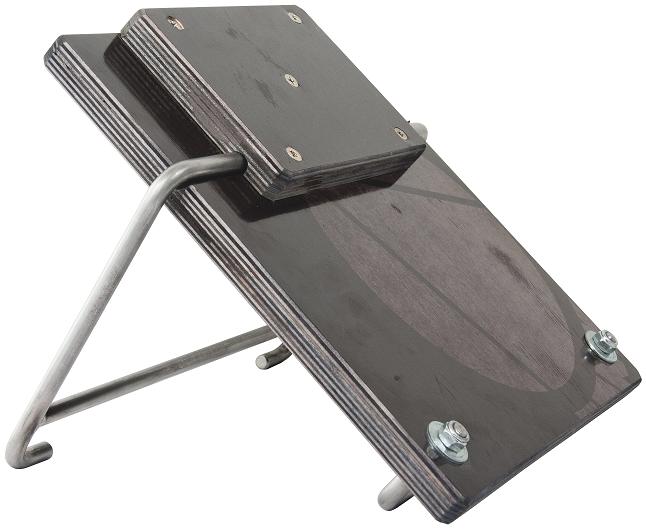
Transom with fasteners
The entire structure is assembled
It is not at all necessary to buy a boat with a transom for a low-power (no more than 2 hp) motor. To do this, it is quite possible to use an O-shaped boat, on which you can mount a homemade transom.
Below I will describe this modernization, which I did first for an old rubber boat with low sides, and subsequently for the Piranha. With this motor mount design, I successfully plumbed on the Oka River for 4 years under the Salyut EM motor.
First of all, I want to note that I will not intentionally give dimensions, since they will have to be made specifically for the required boat.
The point of modernization is that a solid base is laid on the bottom of the boat. Spring fittings are mounted on it using brackets, to which the transom itself is attached.
All this can be installed on the boat within 10 minutes.
For the base you can use thick plywood. It is advisable to paint it a couple of times so that the paint is absorbed. The "Piranha" has a rather long bottom, so I made the bottom from two halves, fastening them with ordinary window hinges. It is not necessary to make a hard bottom the entire length of the boat. Mine is a little longer than half the boat. This is to load the bottom in the center of the boat, shifting the center of gravity away from the engine.
For the bottom I used a door from an old cabinet. Chipboard cannot be used for these purposes!
So, we measure the plywood to the size of the bottom of the boat. In general, the thicker the plywood, the better. In the corners I attached rubber from a car inner tube so that the corners would not rub the rubber of the cylinders. It should be fastened with short screws, but not with nails.
Having adjusted the bottom to size, we attach two metal bases 1 with a tube welded to it onto it. The tube is from a half-inch water pipe.
Ordinary ribbed reinforcement 2, which is used in construction, is inserted into the tube. To bend the reinforcement correctly, make a template from thick wire. Both reinforcements must be bent equally. It is necessary, of course, to measure the required bend of the reinforcement on an inflated boat.
For the reliability of the design, I fastened both fittings together with seat 5, on which, in fact, I sit, controlling the motor. Plates 3 (for fastening the seat) with a hole are welded on the fittings. 4 bolts are fixed inside the seat (so that they do not turn) and with the help of “wings” the seat holds both fittings together.
Next, a very important thing is mounted. These are, in fact, two thick plywood 6, fastened together. A groove is hollowed out between the halves for the bolts, with the help of which this plywood is attached to the reinforcement through plate 7. This plywood (or board) stand must lie on the backboard along its entire length! The purpose of this board is that when the engine is loaded, it does not bend the entire bottom, but mostly puts pressure on the rear cylinder.
I would like to warn you that motors with a power of more than 2 hp. This design has not been tested, so when installing a more powerful motor, you should be very careful. Most likely, with full throttle, you will simply overturn the boat.
Making a transom is also not difficult. Again using multi-layer plywood. Having selected several layers of plywood so that the motor can be attached to them, fasten them together with any brackets. It is advisable to paint over it all several times.
I would like to draw your attention to the fact that the transom must be mounted to a certain height specified in the passport for the motor.
Let me note once again that this entire structure is mounted on the boat using “wings” within 10 minutes. Carry a supply of “lambs” with you, since everything is mounted when the boat is on the water and it is very easy to drop the “lamb” into the water.
Look at a few photographs of a similar modernization for the rubber "Piranha - 2M". This boat already has a glued transom, but when installing a 2 hp motor. the boat bends strongly as the rpm increases. The finishing touches were carried out and the boat has been in operation with this engine for 2 years. Because The boat has fastenings for the transom, but of course there is no board on the rear side.
Homemade bottom from an old cabinet door
The second half of the bottom, fastened to the first loops
Inserted into reinforcement grooves

Seat with fasteners
The entire structure is assembled

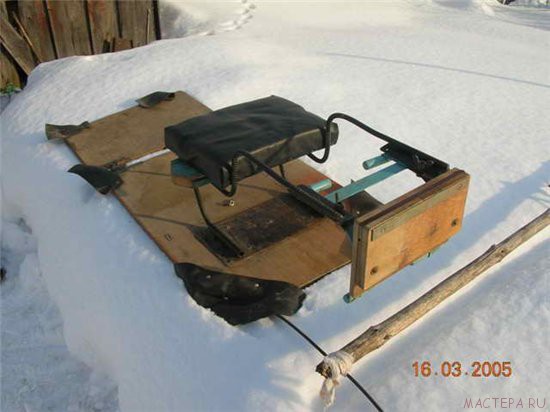
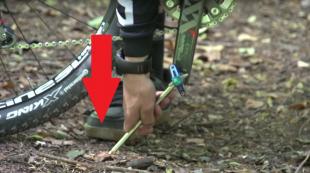
If your boat does not have a transom mount, as in the bottom photo, then instead a board is attached to the fittings for the entire length of the tailgate. This is necessary so that when the load from the engine increases, all the force is directed to the tailgate. This way the boat will not bend.
In the bottom photo you can see that a spinning rod stand is attached to the base, and a mount for an echo sounder is attached to the seat.
That's all! Happy sailing!
PVC inflatable boats with a hinged transom are universal in operation. They can be used either with oars or with a motor. A hinged transom adds little to the cost of the boat, but expands the range of its use. The seaworthiness class limits the use of boats with a transom in low waves on small bodies of water and close to the shore. On the other hand, PVC boats when folded are compact, lightweight and easy to transport in a car.
Features of this type of boat:
- the presence of a hinged transom makes it possible to use it on a boat PVC motor up to 3 horsepower;
- vessels up to 3 meters ensure comfortable use by one person; longer boats can comfortably accommodate two;
- if you plan to cast with a spinning rod, then there must be 1 person on board;
- maximum speed boats with a motor is 10 km/h.
PVC boats with transom in the online store
Our online store offers a wide range of boats with transom. Depending on the operating conditions, you can select and buy the optimal lodki model for you. Boats with a hinged transom are a great way to save money but benefit from quality. We sell only high-quality rowing and motor vessels of various carrying capacities from well-known and trusted manufacturers. If you cannot make your own choice of boat, please contact our consultants by phone. They will provide you with complete information about prices and characteristics and help you place an order. Delivery is carried out throughout Moscow and the region, pickup is possible.
The pursuit of excellence has no limits, especially when it comes to improving what you love.
Amateur fishing, undoubtedly, is one of those activities that requires not only a reverent attitude and improvement of personal skills, but also the use of considerable ingenuity and patience to create sometimes even unique and inimitable devices.
One of these necessary devices for inflatable PVC boats there is a hinged transom for mounting the motor.
Most manufacturers of PVC rubber boats offer boats of various types and classes in their product range, which are called from “economy class” to “elite” or “extra” class.
![]()
However, among amateur fishermen there are mainly PVC boats designed for rowing, and these are mostly small-sized one or double boats designed for small bodies of water.
At the same time, taking into account the fact that both new and used electric motors for imported PVC boats have long appeared on the market at a very high price even for a novice fisherman, many have a desire to provide their boat with such an engine.
In addition, some fishermen have in their arsenal more serious boats and catamarans that can provide normal movement using outboard motors with an engine internal combustion, providing movement at speeds of up to 12-15 km/h.
However, the only thing left to do is to ensure reliable fastening of the motor to the watercraft, and although the Internet is replete with offers from stores of various types hinged transoms real craftsmen always come up with a truly unique design, individual for each boat.
Transom and motor
 Basically, mounted transoms are intended for installing electric motors of almost all modifications.
Power electric motor with a battery is quite enough to ensure smooth sailing of a boat with two passengers at a speed of 6-8 km/h.
To do this, it is enough to install a small transom with fastening to the rear side of the boat or install a transom with fastening to the rigid base of the bottom of the boat.
To install a more powerful gasoline outboard motor, not only a more powerful mounting design is required, but also an appropriate driving performance boat, so when self-production hinged transom for boats with gasoline engine should be approached more carefully.
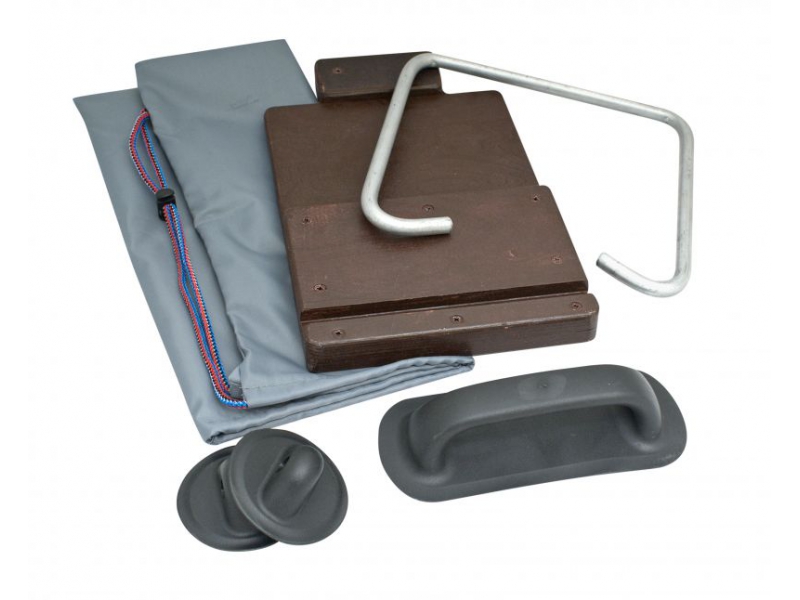
Design
Almost all designs of mounted transoms are similar to each other.
Basically it consists of boards, fastening arches and eyes:
- board is a square or rectangular plastic, plywood or wooden board, covered with an appropriate moisture-resistant coating, 20-25 mm thick, having additional holes, depending on the design solution.
- the arcs are used to attach the board to the side of the boat. The arcs themselves are made of steel or aluminum, the ends of the arcs must be carefully processed, the chamfer should not have burrs or nicks that could damage the boat's cylinder. The arches can be connected to the boat by bolting or using rivets. Like the arcs, the bolt heads and threads must be carefully machined.
- eyelets - special rubber holders glued to the side of the boat for attaching the arches. Eyes can be either factory-made or homemade, the main criterion of which is the reliability of attachment to the boat cylinder.
Materials for production
To make the board, special waterproof plywood is used, impregnated with a water-repellent composition; such material is not afraid of moisture and can remain in an unfavorable environment for a long time.
The plywood is glued with epoxy glue in several layers until a thickness of 20-25 mm is achieved.
After gluing, the workpiece is processed, the edges are rounded, burrs are removed, and painting is done in several layers.
How to catch more fish?
I have been active fishing for quite some time and have found many ways to improve the bite. And here are the most effective:- . Attracts fish in cold and warm water with the help of pheromones included in the composition and stimulates its appetite. It's a pity that Rosprirodnadzor wants to ban its sale.
- More sensitive gear. You can find reviews and instructions on other types of gear on the pages of my website.
- Lures using pheromones.
For arcs used:
- aluminum rod or pipe;
- metal pipe;
- metal profile or strip.
The main issue when making arcs yourself will be welding work, while metal parts can be welded in any garage where there is electricity and an electric welding machine, but with regard to aluminum structures things are much worse; here you cannot do without special equipment.
As for the eyelets, it is safer and cheaper to order mounts for safety rails in the store; they are made of soft but durable rubber, do not require additional processing and adhere well to the cylinder.
Nothing can be said about self-made fasteners; this is a creative matter and there is nothing to advise here.
Manufacturing
As already mentioned, the board is made of plywood or plastic.
For this:
- a rectangle is cut out or rectangles of the required size;
- gluing is performed;
- after drying, the corners are processed– cleaned from chips and burrs, rubbed with sandpaper, impregnated with water-repellent varnish;
- joints with arcs are marked, holes are drilled;
- additional processing of the internal surfaces of the holes is carried out– the holes are sanded and impregnated with varnish;
- final painting is done with varnish or paint, dried until completely dry.
The production of arcs is carried out as follows:
- cut to size of the workpiece;
- arcs are welded together to obtain a rigid structure;
- plates with holes are welded for fastening bolts or rivets;
- ends are processed, welding seams, metal is cleaned for painting;
- priming and final painting are carried out.
Advice: it is recommended to prime the metal frame with red lead and paint with hammer enamel.
Gluing of rails or eyelets is carried out at pre-marked places in accordance with the technology for repairing PVC boats:- mounting points are marked on the boat;
- degreasing is carried out glued surfaces;
- Apply a small layer of glue to both surfaces, and after a short drying time, the bonded surfaces are pressed against each other;
- the resulting connection is placed under a press and left until completely dry.
Installing a transom on a rubber boat
After completing the preparatory work, the resulting structure is assembled:
- the boat is inflated;
- the board is attached to the arches and secured bolts or rivets;
- the ends of the arcs are inserted into the eyelets and fixed;
- The correct fastening and installation height of the transom are checked.
Transom height
And although the design of the transom is a very simple thing, it is still worth measuring seven times and doing it only once. This concerns, first of all, the height of the transom.
If the height is too high, this will create a certain inconvenience - the motor will be located too high, the propeller blades will be almost under the boat’s cylinder.
As a result, the speed and controllability of the vessel will be significantly reduced.
On the contrary, a low transom position can significantly impede movement due to the board being submerged in water.
In addition, setting the motor too low requires a change in the position of the helmsman's body and, as a result, a change in the distribution of mass inside the boat, which can affect the safety of navigation.
Reinforcement of the hinged transom
To strengthen the transom and add rigidity to the structure, fishermen sometimes resort to non-standard solutions - strengthening the transom with side rods to additionally installed rail fastenings along the sides of the boat, or making a rigid base of the boat and rigidly attaching the transom to it.
In any case, as practice shows, even the most ideal technical solution sooner or later during operation it will require additional improvement and modernization. So there is practically no limit to perfection here.
Now only mine bites!
I caught this pike using a bite activator. No more fishing without a catch and no more looking for excuses for your bad luck! It's time to change everything!!! The best bite activator of the year! Made in Italy...